One of the greatest ongoing frustrations for many computer users – even those with some technical ability – is the configuration of an email client to send and receive messages. A part of me finds it surprising that even now, with email having been a part of our professional and personal lives for so long, I still get questions about this. Still, I must agree that configuring email clients is often not a particularly user-friendly process.
WordPress: Why Self-Hosting WP Is Better Than Using WordPress.com
 If you are a blogger or even a regular reader of blogs, you are probably familiar with WordPress even if you’ve never used it. Since its release in 2003 it has evolved from a basic blogging platform to a flexible yet easy-to-use content management system, thanks to the efforts of many developers and users. It is currently the most popular blogging platform on the internet.
Aside from the ability to post writing, images, or other media, one can also create and edit regular web pages – sometimes referred to as static content, in that it is information that is not time-sensitive as blog posts often are. Non-bloggers can forego the blog posting function altogether, resulting in what might be considered a more “traditional” website.
WordPress users have the option of changing the overall look and feel of their sites via the selection of a theme, which is essentially a series of templates dictating various elements such as layout, colour, typographical detail, and sometimes other special features. Additional functionality can be enabled with the integration of various plugins, chunks of pre-written code offering a wide range of special virtual gadgetry. The degree to which one can use these features to customize a WordPress site depends on whether the site is hosted at WordPress.com or self-hosted. Continue reading “WordPress: Why Self-Hosting WP Is Better Than Using WordPress.com”
How to Install WordPress on a Web Server, Part One
In my previous blog post, I discussed the benefits and drawbacks of using the blog hosting service at WordPress.com versus installing WordPress on your own web server. As promised, I’m now going to outline the steps you should take in order to install a customizable version of WordPress in the server space allocated to you by your web host.
First of all, you’ll need to download and install some free software in order to work through this tutorial. If you need help installing any of the following programs, please consult the appropriate developer’s website for instructions – and remember, as this is all free software, you can’t expect a great deal of technical support from the developers. Most of them provide support pages or user forums to help you with any specific issues. You can also try searching for a solution via Google, because it is likely others have already encountered the same problem and solved it.
All of the following programs should be very easy to install, so if you do encounter difficulties, you may want to find a friend or colleague who can help you through this process.
Download and install the following programs:
An FTP client. I use Filezilla on both Windows and Mac OSX. This program allows you to transfer files to and from your web server.
A text editor. On my Windows machine, I use Notepad++. Please note, this is not the Notepad that is already installed as part of Windows (although it can work as well, in a pinch). On my Mac, I use TextWrangler.
The Firefox web browser, which will work on both Windows and Mac OSX. Although you may already have Internet Explorer on your Windows machine, or Safari on your Mac, Firefox is a better browser for web development for two reasons; first, because it is more in line with current web standards than some other browsers, and second, there is a terrific development tool available for Firefox called:
Firebug. You’ll need to have Firefox installed first. Then, open it up, return to this blog post, click the Firebug link I’ve provided, and follow the instructions. This is a great little add-on that lets you inspect the code behind various elements of your website – it is particularly helpful for figuring out which CSS you need to change in order to modify type, colours, or other parts of your site layout. I’ll be getting into this in the second part of this tutorial, so you don’t have to install it right now.
The latest version of WordPress. When you click the download button, save the zip file to an appropriately named new folder you’ve created for all of your website files, or move it there from your Downloads folder afterwards. I’m sorry to be pedantic, but it is important that you keep your files organized in appropriate folders, because it allows you to find them easily six months or a year from now when you need to work with them again. It can also reduce the potential for making mistakes, such as uploading the wrong file or backing up files in the wrong location.
Extract, or unzip, your WordPress file
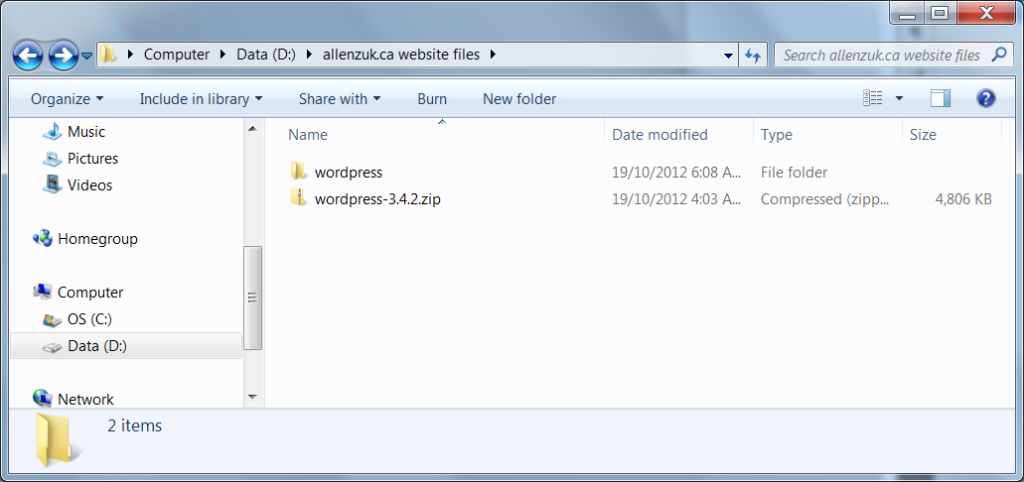
This might take a minute, so feel free to do this now while you’re performing these other steps. You should extract it into the same folder, and when it’s done, all the files should be contained in a folder called wordpress. So, when the extraction in done, your website file folder should look something like this:
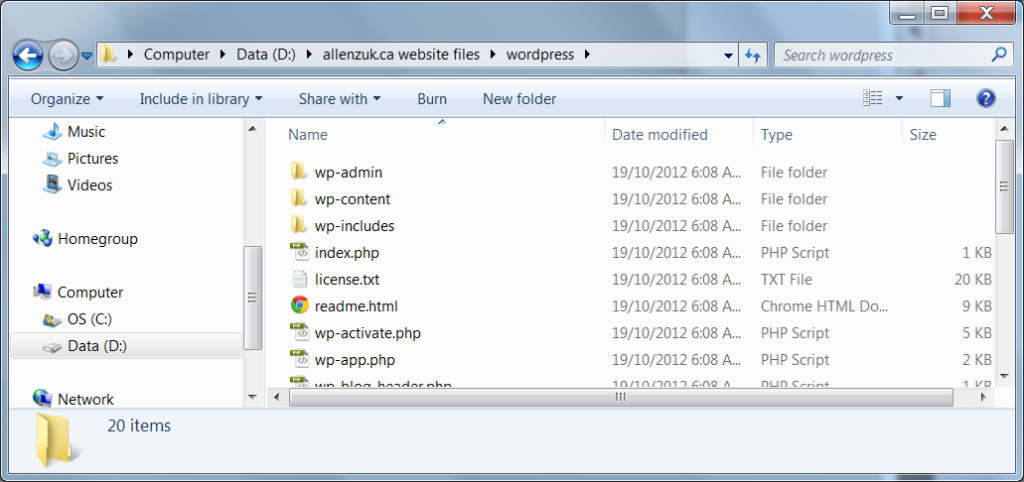
You can keep the zip file as a backup if you wish. When you double-click on the wordpress folder, you should see a bunch of folders and files, like this:
Set up an administrative email address
You should create a separate email address under your new domain name for all of the admin messages and other junk you’ll get while you’re setting up your site. You’ll probably have to log into your web hosting account’s administration area – which is usually referred to as a control panel – in order to set up this new email address. You may have control panel login details from when you created an account with your web host, or they will have sent you a username and password after you purchased your hosting package. Don’t use your personal email account for this, because although most of these will not be urgent messages, it is important to ensure you keep all of the messages you get in this account. Also, be sure to check it at least once a week. If you want to set up your Gmail account to receive email from this new address, please refer to my blog post about that here.
Creating a MySQL database
You’ll also need to create a MySQL database, a database user, and a database user password, and this will likely have to be done in your web host’s control panel as well.
This process will vary depending on the host you’ve chosen, and as there’s no possible way I could cover all of the available hosting companies out there, I’m going to show you how this is done if you’ve purchased a cloud hosting package with my company. (Yes I know – how convenient.) But before we move forward, a few side notes:
- If you’ve looked through your web host’s support documentation and the WordPress installation page for help with creating a database and you’re still stuck, you’re well within your rights to ask your web host for help. When you do this, they might tell you to use their one-click installation feature for WordPress. You can do this if you want, but I can’t guarantee the customizations I’ll be showing you in the second part of this tutorial are going to work.
- If your web host offers to set up the database for you, be sure to thank them, then tell them you’ll need to know the database name, the username, the password, and the hostname. You’ll need this information to perform the WordPress installation.
- If your domain name is registered with someone other than your web hosting company, you’ll need to ensure the correct nameservers have been entered in your domain name settings so that it points to your web hosting company’s server. You’ll need to ask your web host for the nameservers (there are usually two), and then you’ll have to ask your domain name registrar how to enter them – and you should do this 24–48 hours before you try to install WordPress. If you’ve purchased domain name registration and web hosting from the same company, you don’t need to worry about this.
OK – let’s go! First, open your text editor. You’ll need a blank page to note the various bits of information about your database so we can enter these details into WordPress later on.
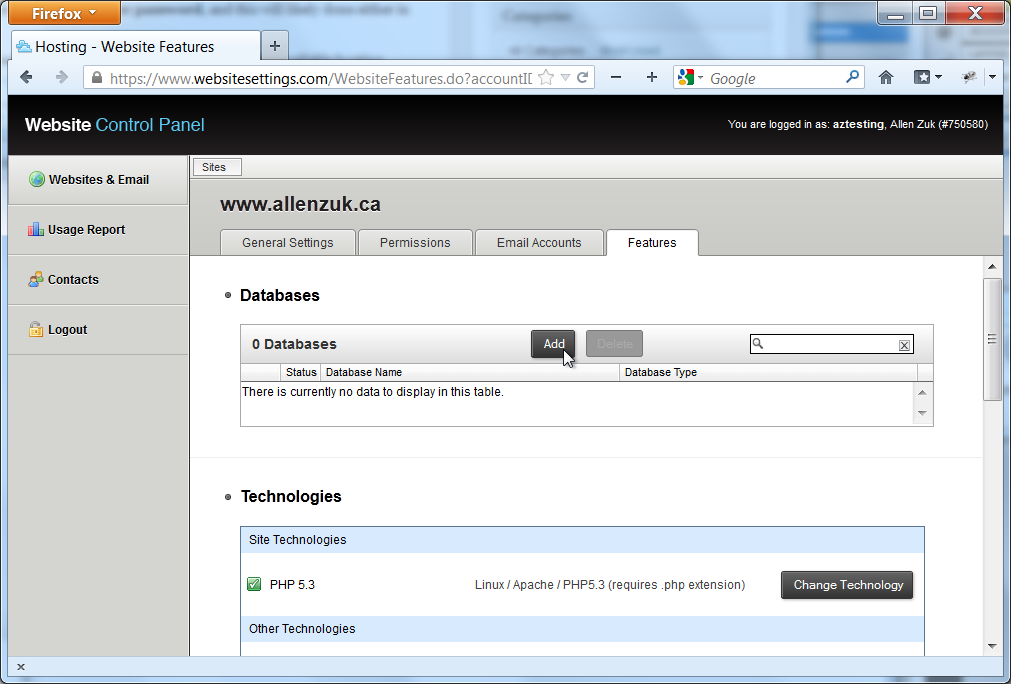
Then (if you have a hosting account with me), log in, click on your website name in the Website List, and click on the Features tab.
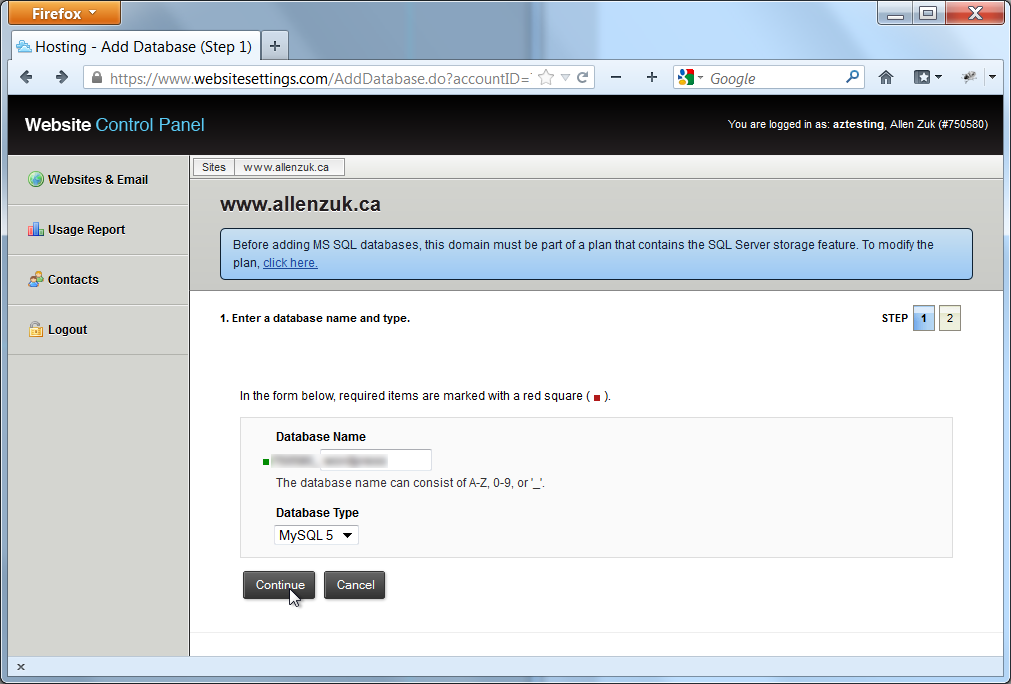
You’ll see the Databases section at the top. Click on the Add button.
This brings you to a screen where you will have to choose a name for your database. The full database name will consist of a series of numbers and an underscore which will be provided for you, and the rest can be whatever you want within the rules displayed underneath. Enter the rest of your database name, and make a note of it (the numbers, the underscore, and the rest you’ve entered) in your text editor. Double-check this to ensure it is correct. Once you’re ready, click the Next button.
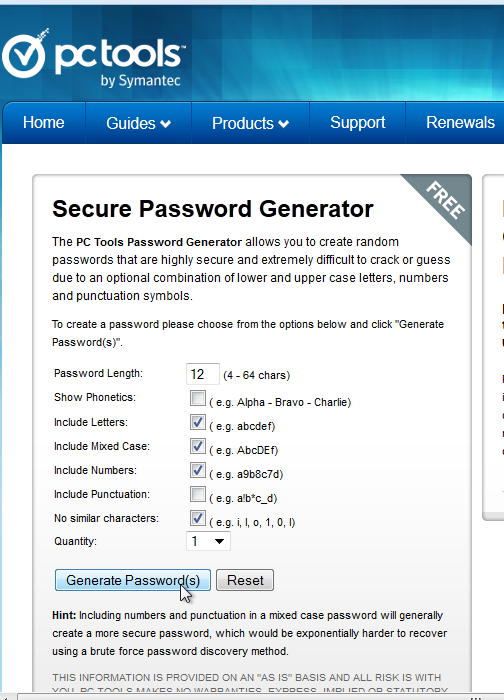
Before you enter anything in the next screen, you’ll need to come up with a password. I use Symantec’s Secure Password Generator (this link will open in a new tab or window). When setting parameters, please keep in mind you can’t use punctuation in this password, so make sure that particular box is unchecked, but you’ll want a nice mix of numbers and letters so that it’s secure. Click on the Generate Password(s) button, then copy and paste the resulting password into your text file.
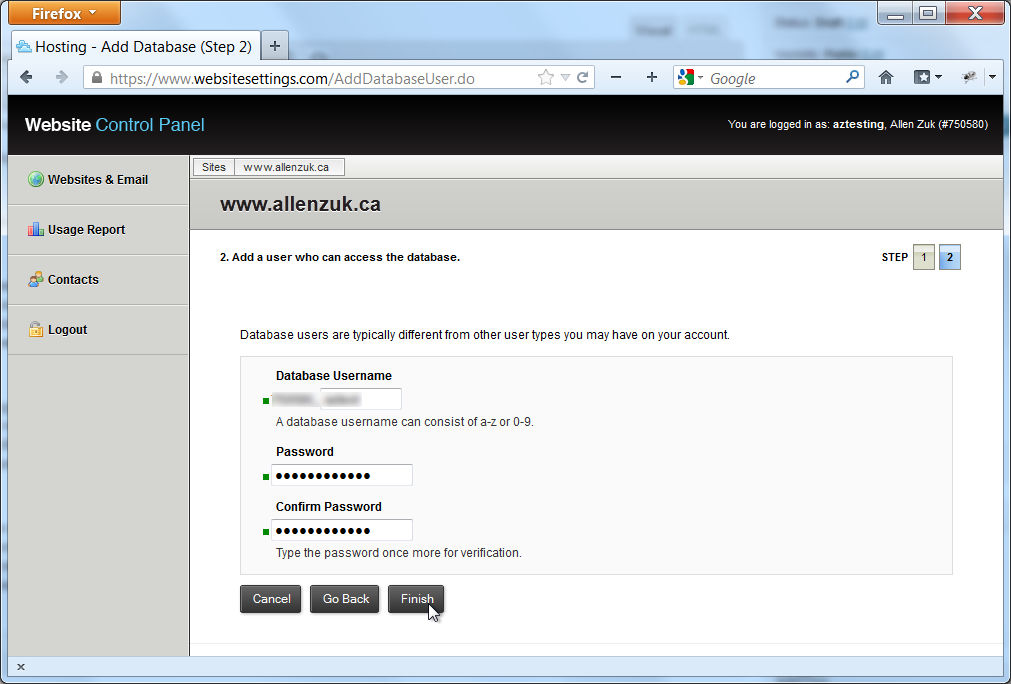
The username you create can be anything you like – although it has a series of numbers and an underscore like the database name, it should not be the same. Once you’ve chosen a username, make a note of it in your text file. Double-check it and make sure you don’t forget which is the database name and which is the username. Once you’ve done that, copy and paste the password you generated in the previous step into the spaces provided, and click Finish.
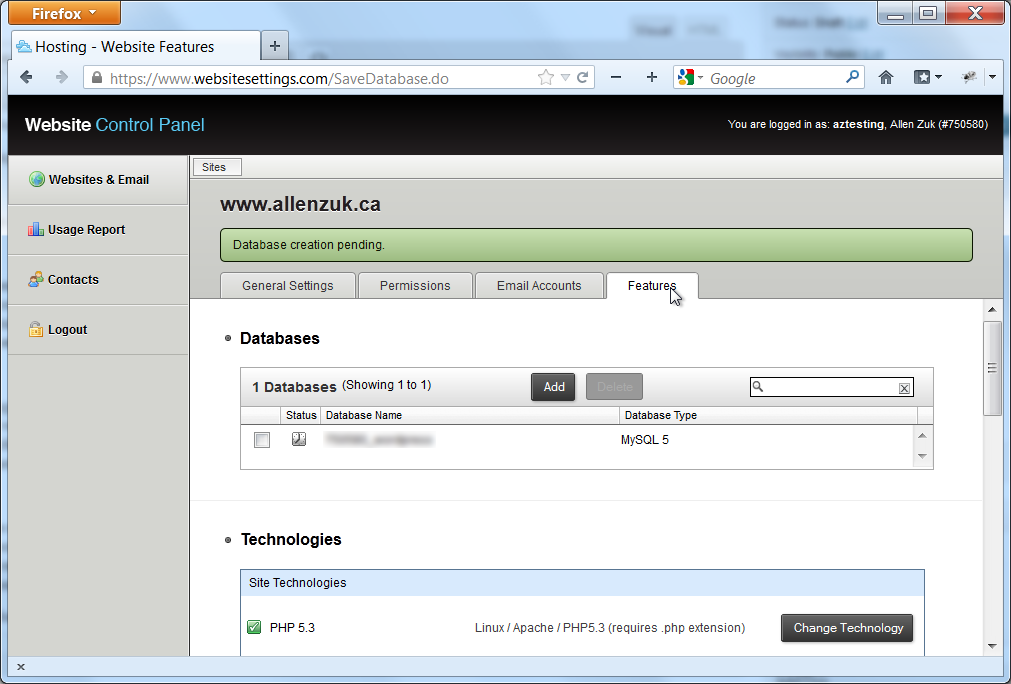
You’ll see your new database name in a list, and a note stating “Database creation pending.” Wait about a minute, then click on the Features tab again, which will refresh the page (don’t use Refresh or Reload in your browser). If you still see the “Database creation pending” message, wait another minute and click the Features tab again.
Eventually you should see a green checkmark beside your database name. Once it appears, you’ll also be able to click on your database name. Go ahead and click on it.
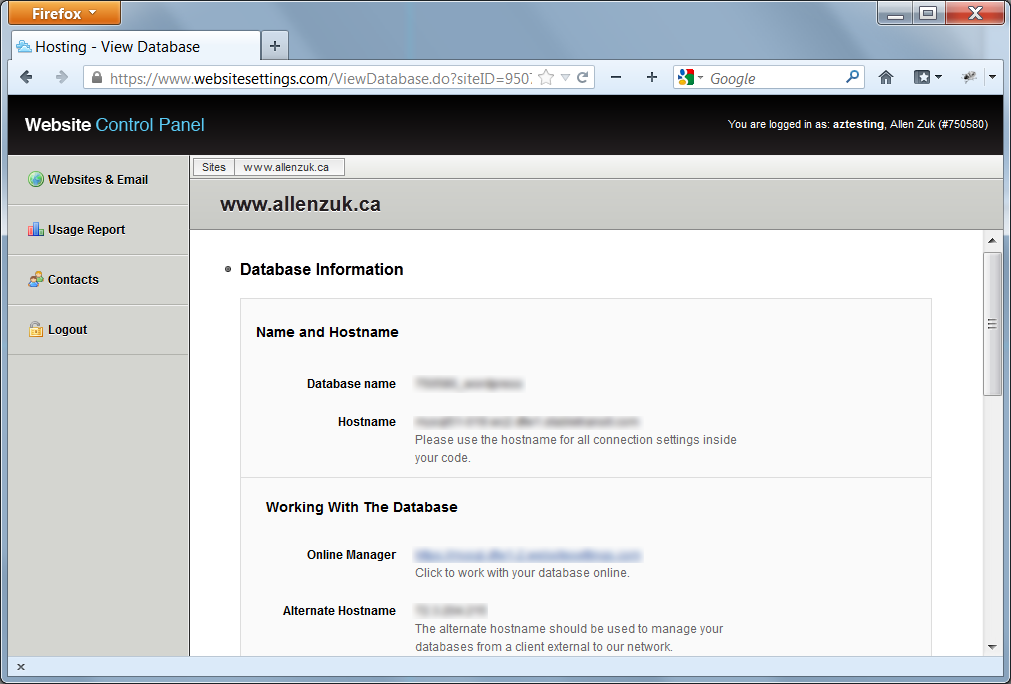
On the following page, you’ll need to make a note of the Hostname. Copy and paste it into the text file with your database name, username and password.
Also, note the Online Manager link. This is the link you’ll click if you ever need to access phpMyAdmin, a program that allows you to perform various administration tasks – it is unlikely you’ll use this for anything other than backing up your data, which you’ll have to do if you ever want to move your WordPress site to another server in the future. For now, though, simply log out of the Control Panel and go to the wordpress folder within your website file folder.
Preparing the WordPress configuration file for upload to the server
For the next stage of the process, you’ll need to find a file in the wordpress folder called wp-config-sample.php. The first thing you need to do is rename it to wp-config.php, so if you’re working in Windows, right-click the file and select Rename in the flyout menu. On the Mac, select the file and hit the Enter key. Rename the file to wp-config.php, then open it in your text editor. You should now have two text files open: the one with your notes from the database setup, and wp-config.php.
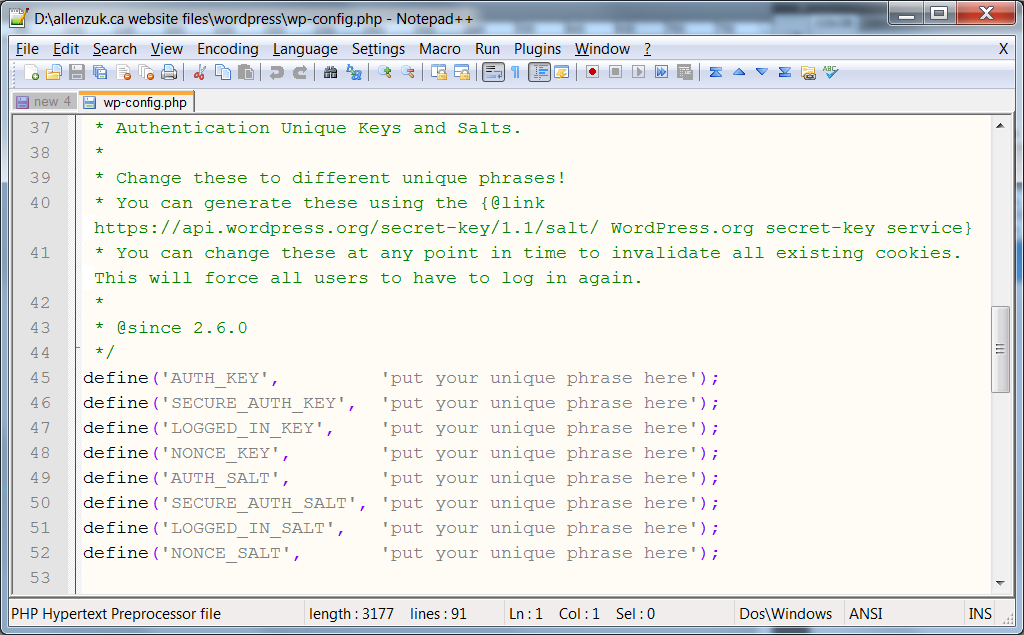
Scroll down a little bit until you see the code above referring to MySQL settings. Next, you’ll want to carefully copy and paste within the single quotes in the code:
the database name, replacing database_name_here
the username, replacing username_here
the password, replacing password_here
the hostname, replacing localhost (note: this may remain the same with some web hosts).
Once you’ve pasted in the above code, Save your file, but do not close it yet.
Next, scroll down until you get to the section for Authentication Unique Keys and Salts. When people post comments on your blog posts, they have to log in, and WordPress uses cookies in order to track site visitors who have logged in. In order to encrypt this information, several unique strings of random characters are used. You can generate these automatically by clicking here (link will open in a new tab or window). Copy and paste the resulting chunk of data from your browser window into the appropriate place in the file, replacing the code that is there now, from the first define to the last semicolon. Save your file, and close it.
You may want to keep your notes file open as a backup for the time being in case your installation doesn’t work, as it might simply be due to a copy/paste error.
Speaking of cookies, if you are reading this in the UK/Europe, you may already know there are new laws regarding cookie use in the EU as of March 26, 2012. Your site must inform visitors if it uses cookies, and offer the opportunity to opt out. Fortunately, there are several WordPress plugins available that will handle this for you – simply search for “EU cookie” at the WordPress Plugin Directory.
Uploading the WordPress files to the web server
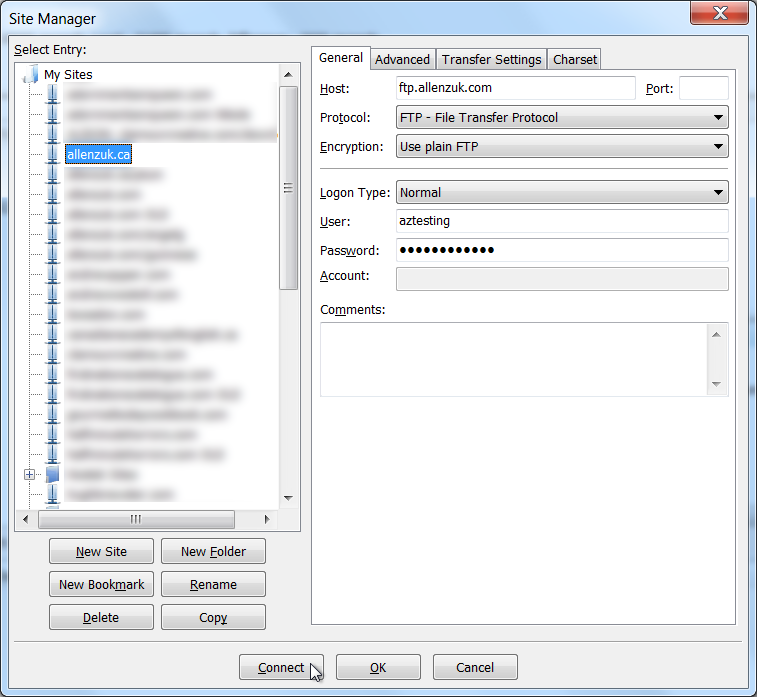
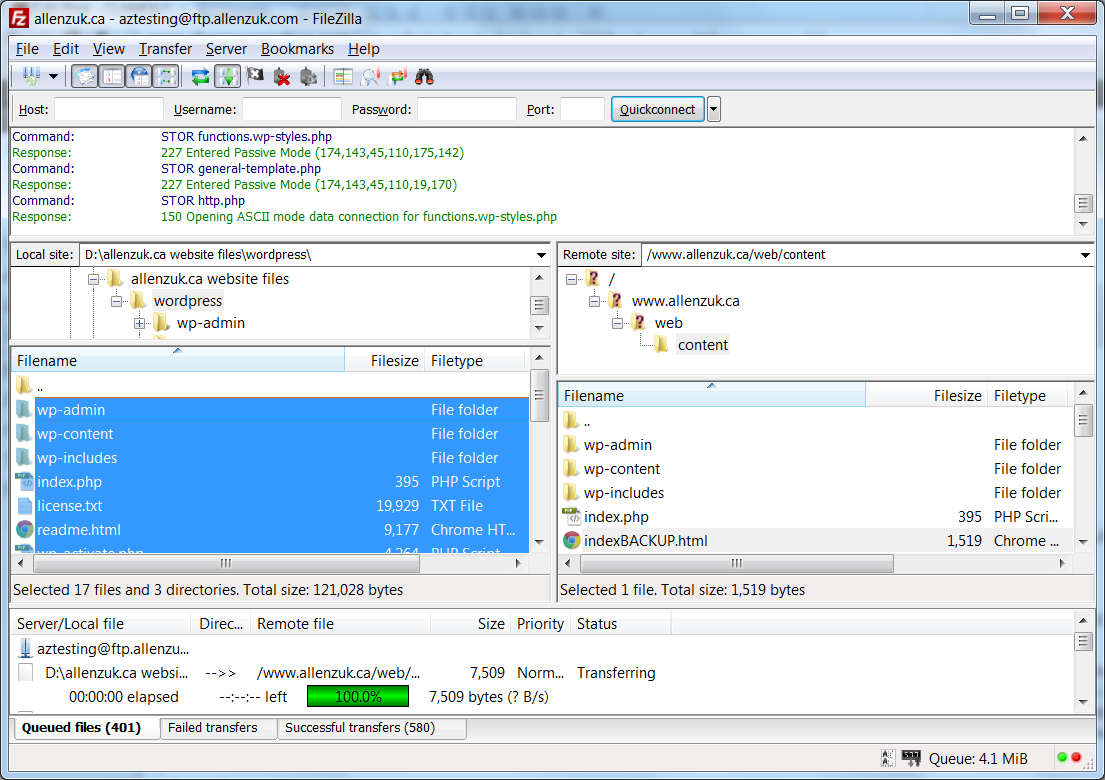
Open FileZilla and click on the Site Manager button – this is the leftmost button in the toolbar. Click the New Site button, name your site (this can be anything you want, but be sure it refers to the site you’re working on) and enter the FTP details to access the web server. You can get these details from your web host – they are usually available, as with most other web hosting information, in your web account’s control panel.
At minimum, you’ll need to enter:
the Host, which is usually (but not always) your domain name with ftp in the beginning instead of www;
the Logon Type, which is usually Normal;
the User or username; and
the Password.
Then, click on the Connect button. These details will automatically be saved in the Site Manager menu for the next time you want to connect, and you’ll also be logged into the web server immediately.
In the Remote Site section – the two windows in the middle right of the FileZilla interface – you should now be seeing the folders on the remote site. If you’ve encountered an error trying to connect, it is most likely that you have made a mistake entering login details, so go back to the Site Manager and re-enter everything again.
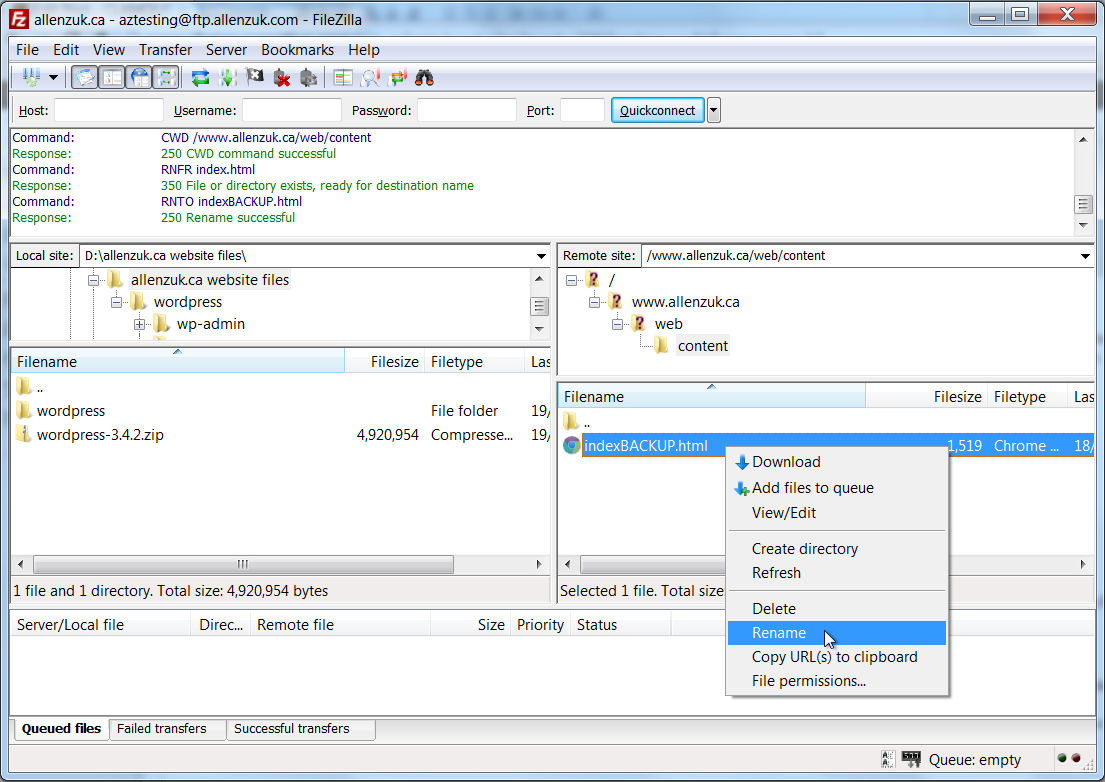
Make sure you check with your web host to find out which folder you are supposed to put files into for them to be visible on the web, then navigate to that folder. You should see a placeholder file of some kind, which is what people will see if they try to visit your site before you have uploaded anything to it, and this will usually be called index.html. Right-click or CTRL-click (Mac) to bring up a menu and select Rename. Rename the file to indexBACKUP.html. You could simply delete it, but it can be handy to have it available as a placeholder later on if you have problems with your installation and you want to prevent people from seeing website error messages while you are solving any problems that may have arisen (simply rename it to index.html when you want it to be visible).
Next, in the Local Site section in the middle left of the FileZilla interface, navigate to the wordpress folder you unzipped earlier. You should see all of the WordPress files and folders in a list. Select the topmost folder called wp-admin, then type CTRL-A or Command-A (Mac) on your computer keyboard to select all of the files. Then, simply drag and drop them into the window immediately to the right, in the space just underneath the indexBACKUP.html file. FileZilla will spring to life, uploading all of your files to the web server. This will take a few minutes, so you can grab a cup of coffee if you wish.
Note: once uploading is complete, you might see a number in the Failed Transfers tab near the bottom of the FileZilla interface. Click on the tab, then right-click or CTRL-click (Mac) at the top of the list to Reset and Requeue All. This should re-send any failed file transfers. You may be asked to Overwrite some of these files, and you can safely do so. The reason this happens is FileZilla uploads so fast that occasionally a few file transfers will fail midway through – this is generally nothing to be concerned about if you see two or three in the list, particularly during peak web usage hours. If it happens frequently, you should speak to your internet service provider.
Now that all the files are on the server, you’ll need to run the installation. To do this, open Firefox and type the following into the address bar, replacing [your domain name] with your own domain name – and don’t forget to add the proper extension, such as .com, .ca or other.
www.[your domain name].com/wp-admin/install.php
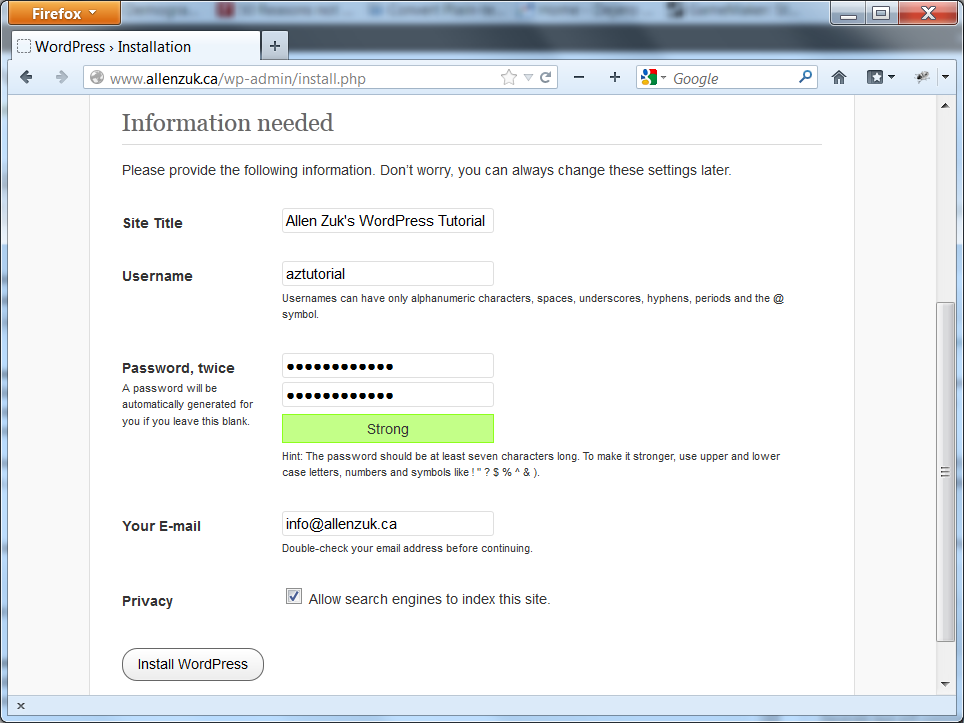
This will initiate the WordPress installation on the server. You should immediately be brought to the Information needed screen with some form fields to complete.
First, choose a Site Title (you can always change this later).
Do not use the default “admin” for your Username as this is somewhat of a security risk – you can’t change this later, so make sure you choose something that is not too long and that you will remember.
You can use the Symantec Secure Password Generator to create a Password if you wish, but ideally this would be something you’ll be able to remember so that you can access your site from wherever you are. Also, unlike when you chose a password for the database user earlier on, this password can contain punctuation, so you should use about 12 characters with upper and lower case letters, numbers, and punctuation. Try creating a pattern on the keyboard that is not obvious enough for anyone else to guess.
Remember the administrative email address I asked you to create earlier? The Your E-mail field would be a good place to use it.
You may not want search engines to access your site just yet, so you can uncheck this option for now unless you already have plenty of content ready to be added. You can enable or disable this feature in the Privacy menu in the WordPress administrative area – I’ll be covering this in Part Two.
When you’re ready, click the Install WordPress button.
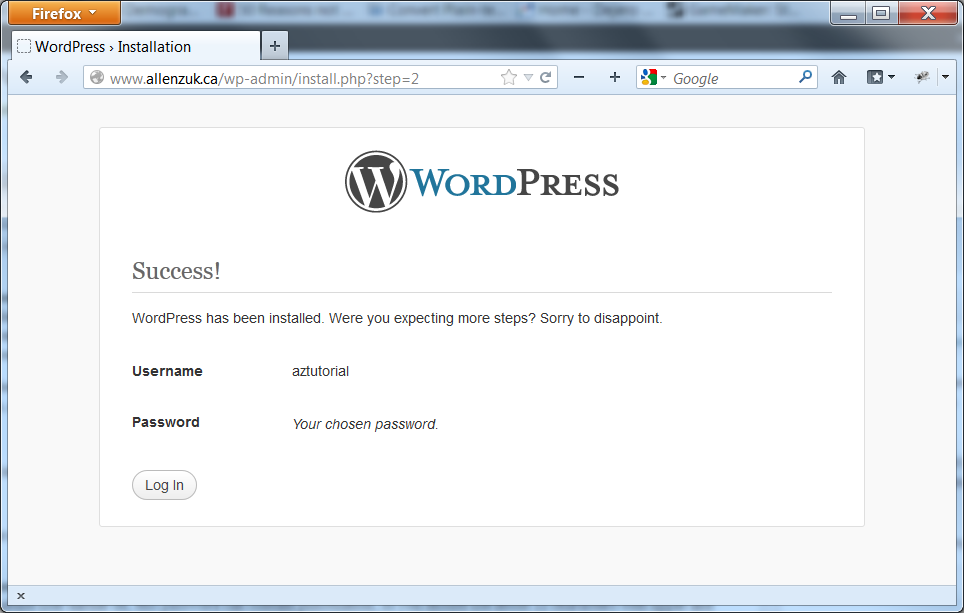
You’re done! Give yourself a pat on the back and splash of whiskey in your coffee.
Problems? One common mistake is that you’ve entered your database information incorrectly in the wp-config.php file. Open that file in your text editor and re-enter the information, then save and upload it to the web server with FileZilla, overwriting the previous version. This might solve a database connection error.
The WordPress Codex is your best source for troubleshooting information, and failing that, try Google. Sometimes you just have to delete everything and start over, which is painful, but often easier than trying to locate the source of a problem.
In my next blog post, I’ll provide some tips on using the WordPress administration system and experimenting with basic customizations to the WordPress default theme.

