One of the greatest ongoing frustrations for many computer users – even those with some technical ability – is the configuration of an email client to send and receive messages. A part of me finds it surprising that even now, with email having been a part of our professional and personal lives for so long, I still get questions about this. Still, I must agree that configuring email clients is often not a particularly user-friendly process.
Most users will encounter this issue for the first time when they have registered a domain name and want to set up a corresponding email account. For example, the email I will be setting up in this example is my personal contact email for my company’s site. My company’s site is located at http://clamourcreative.com, so this email address will be allen@clamourcreative.com. Having an email account with your company’s domain name simply looks more established and professional than using a Gmail or other free email account.
While I will often use Microsoft Outlook when I’m working in-house in an organization in which this is the standard, and on my own company’s computers I use the open source Mozilla Thunderbird so that I can search my email even when offline, I generally recommend that my clients set up a Gmail account to send and receive email because this makes it easiest to keep all their messages in a single location, which can then be accessed on virtually any computer with internet access.
The other benefit of using Gmail is, having a Google account provides access to all kinds of useful Google apps, such as Google Drive for web storage, Google Analytics for tracking website traffic, and Google Alerts to track online mentions of your books or brands, among others.
Let’s get started!
First, you’ll either need to set up an email account by logging into your web host or domain registrar’s control panel, or your web host or domain registrar will set this up for you. This process varies depending on your service provider, but generally they should be able to provide you with a username, a password, addresses and port numbers for your incoming and outgoing email servers.
Next, go to mail.google.com to create a Gmail account if you haven’t already.
You’d be surprised at how easy it is for unscrupulous types to discover passwords based around common names and dates, even if you think these only have meaning to you. While there are security measures in place on most password-protected websites to prevent “brute force” attacks (automated attacks that enter lists of common passwords one at a time), there are many “standard” passwords or character combinations people still use regularly. Don’t use regular words or phrases. You should ensure your passwords are at least 12 characters long, and use a combination of upper and lower-case letters, numerals, and at least one special character (such as punctuation). If you’re concerned about forgetting your password, try organizing it according to a pattern on your keyboard that only makes sense to you – but if you do this, make sure you can easily type it on your devices as well if they use non-standard keyboards (such as a BlackBerry with a physical keyboard).
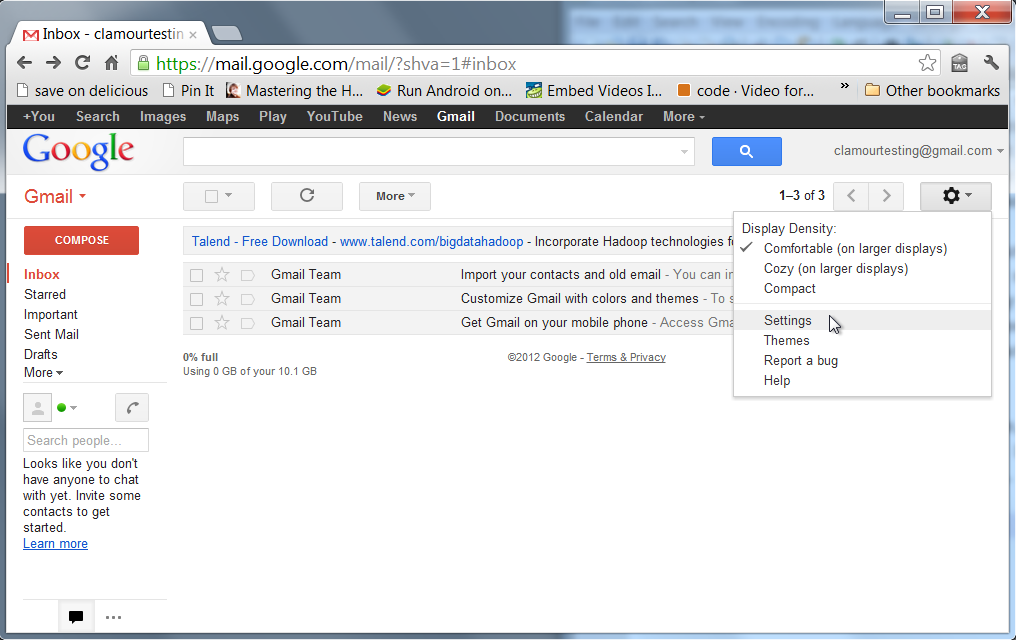
Once your Gmail account has been set up and you are logged in, simply click on the cog icon in the upper right corner of the Gmail interface screen and select Settings.
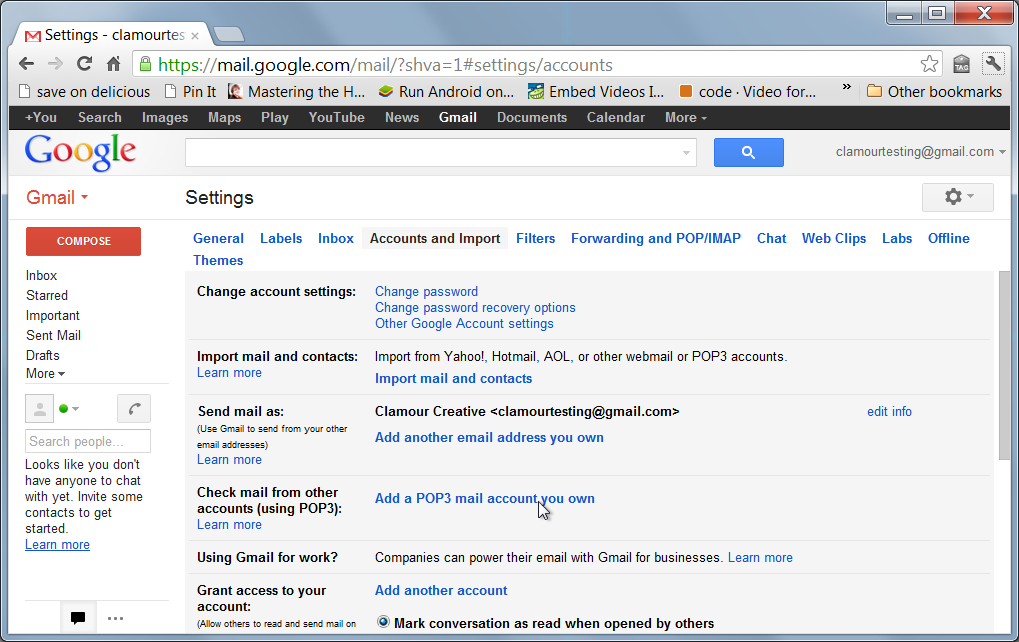
On the next screen, click on Accounts and Imports in the top navigation menu, and under Check mail from other accounts (using POP3) click on Add a POP3 mail account you own.
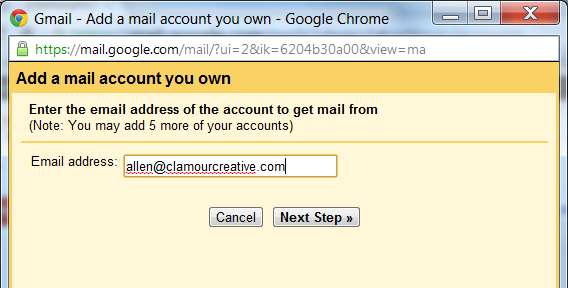
In the popup window that appears, you can enter the email address you want to access from your Gmail account. Note you can only manage 5 additional accounts from within your Gmail account.
As mentioned earlier, in order to acquire your email settings, you’ll either have to contact your web host or domain registrar, or use the Help or Support section of their website to find these settings. The username might be the portion of the email address before the “@” symbol, or (as in my case) it could be the entire email address. As for the password, you will likely already have set this up on your own through your service provider’s control panel, or your service provider may have provided this for you in an email message.
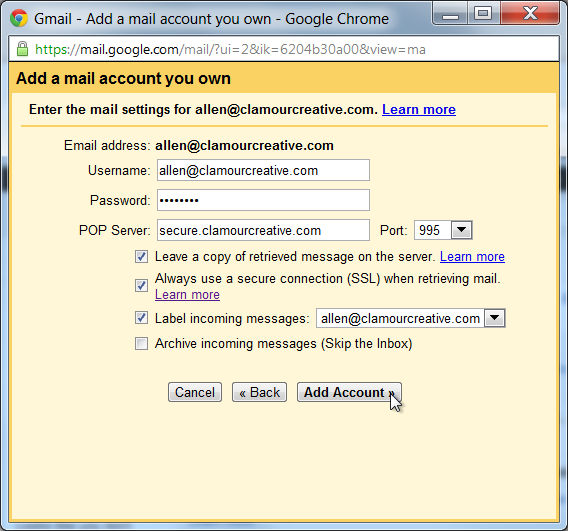
Your service provider will likely offer the option of accessing incoming email using either POP3 (Post Office Protocol version 3) and IMAP (Internet Message Access Protocol) protocols. The primary difference between the two is that while POP3 is designed to download messages and then delete them from the originating mail server, IMAP is designed to download copies of your messages while keeping them on the mail server, and synchronizing a record of existing and deleted messages from the email server to all of your devices. When using Gmail to check a POP3 account, you must use the POP3 protocol. However, on this screen you can indicate you want Gmail to Leave a copy of retrieved message on the server, which will leave messages on the server for you to download with a separate device as well, such as a smartphone.
Additionally, your service provider might have provided you with SSL (Secure Socket Layer) settings for accessing your messages. This will typically be a different server name and port number than an unsecured connection. I recommend using this for an added layer of security as it will help to protect the privacy of your messages while they are in transmission.
Setting a label for your incoming messages will distinguish them from any messages you receive using your regular Gmail account.
Once you’ve entered these settings, click on the Add Account button. You should be brought to a success screen.
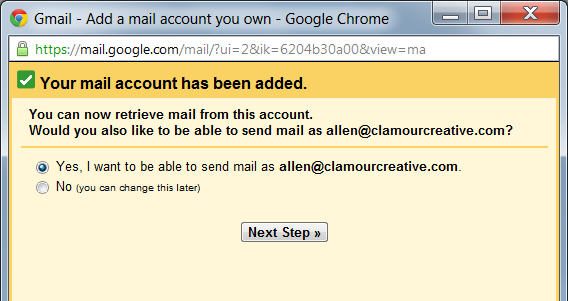
The next step is to enable the sending of mail using this account, using this new email address. If you don’t enable this, any email you send from Gmail, even if you are replying to a message from your new account, will be sent from your regular Gmail address. If you do enable this, you will be able to send email from your Gmail account that recipients will see as being sent from your new account. You will also have the option to choose which account you are sending from when you send a message from within your Gmail account, which will come in handy should you decide to set up more than one POP account.
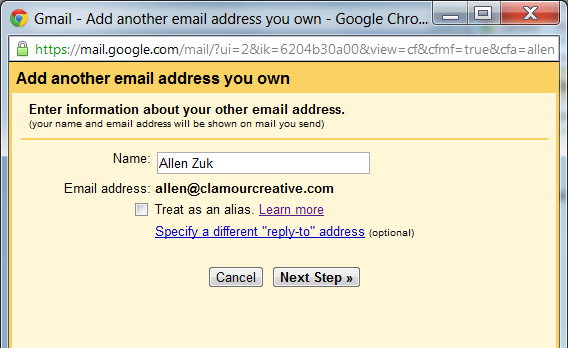
If you are only going to be using this new email address occasionally (for example, to send messages on behalf of a colleague while he or she is away), you should keep Treat as an alias selected. Otherwise, deselect this option before moving on to the next step.
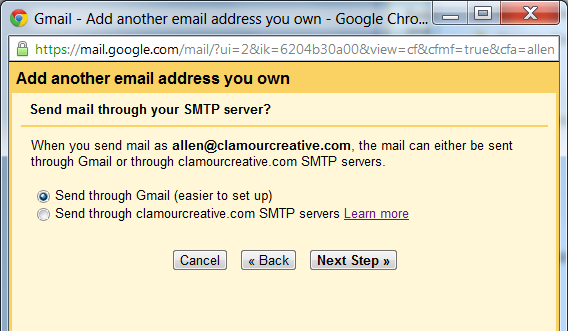
While sending through Gmail is indeed easier to set up, this will have the following effect on your sent messages (from Gmail support):
“Your Gmail address will still be included in your email header’s sender field, to help prevent your mail from being marked as spam. Most email clients don’t display the sender field, though some versions of Microsoft Outlook may display “From yourusername@gmail.com on behalf of customaddress@mydomain.com.” For this reason, if you don’t want ‘on behalf of’ to appear in any of your messages, we recommend using the SMTP servers of your other email provider.”
So, in the interest of sending professional-looking messages, we’ll use our service provider’s SMTP server. Select Send through [yourdomainname].com SMTP servers.
Again, you’ll need to get these settings from your service provider, and you should see if they will allow you to send through a secured connection. Usually, the port number will dictate the type of security used – for example, selecting port 465 will make the SSL option the recommended one, as indicated in the screengrab below.
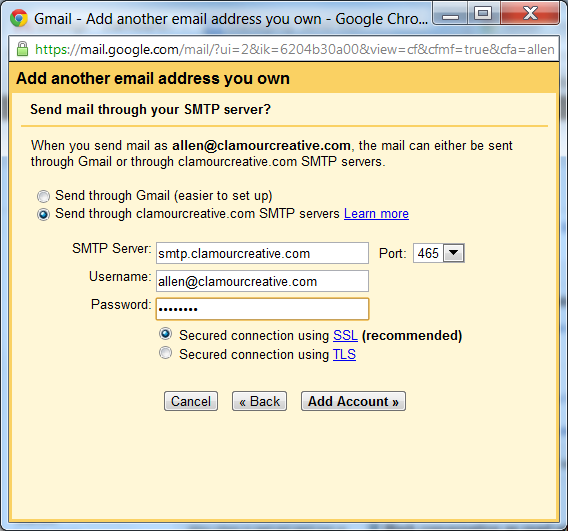
Please note, you should get outgoing server details from your web host or domain registrar – whichever of these you pay to host your email addresses – but not your internet service provider (ISP). (Until recently in Canada, the bigger ISPs such as Bell and Rogers would not allow you to send messages from home through any server other than their own, so you might have been using a standard SMTP outgoing email server provided by them in order to send email messages from home. This was a spam prevention method, and it now appears this restriction has been lifted, but in any case, this is not the outgoing server you should use here.)

So long as you have entered your SMTP server details and password correctly, you should arrive at the confirmation screen above. You can now close this window and check your Gmail inbox, where your confirmation email will be waiting along with any other messages that have already been sent to your new account. Simply click on the link indicated in your confirmation email, and you’re almost good to go – but first, click on the cog icon in the upper right corner, select Settings, and click on the Accounts and Import tab in the nav menu.
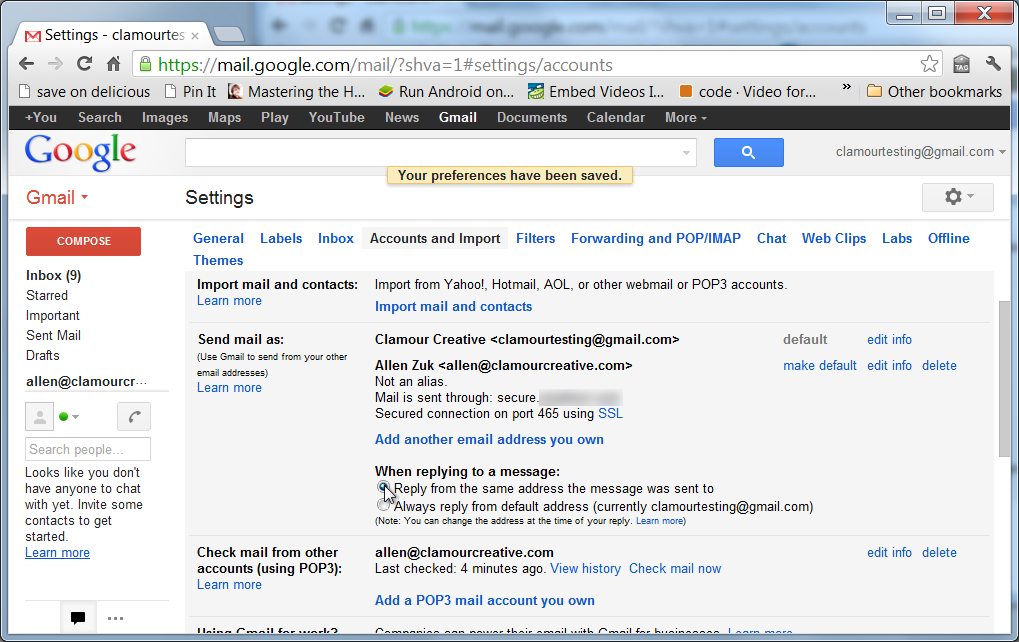
In the Send mail as area, under the When replying to a message section, be sure to select Reply from the same address the message was sent to. You can change this in individual messages, but it’s easy to forget to do this. Gmail will then save this change immediately, and will indicate this near the top of the window. After that, you’re good to go!
Whenever you’ve set up a new email account, it’s never a bad idea to send a message or two to people you have phone contact with, and ask them to reply, just to ensure things are working as they should be. If you aren’t receiving messages fairly promptly, first ensure that your friends’ spam blockers aren’t putting your messages into a spam folder. Second, double-check for errors in your Gmail settings. Finally, if nothing else seems to work, contact your web host or domain name registrar (whichever you pay to host your email) for help.
Now you can check email from any internet-enabled computer with a web browser. If using a public computer, don’t forget to Sign out of Gmail when done! And, for an added layer of security, you might want to enable 2-step verification. I’ll talk about this in the next Clamour blog post.
